Step 1: Confirm your TV is on.
Step 2: Unplug and replug the video connectors on the TV and on MovieNite:
If you are using an HDMI cable to the TV, be certain the connector is fully inserted into the HDMI connector on MovieNite and the TV. HDMI connectors are made to be a little tight to avoid cables coming loose too easily.
If you are using the standard TV composite analog cable that came with your MovieNite, be sure the single connector is fully inserted into the MovieNite AV connector and the separate yellow, red and white connectors are connected to their matching connections on the TV.
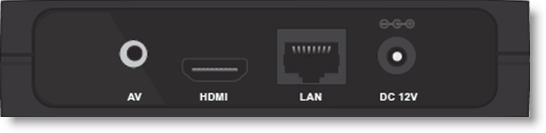
Step 3: Make sure the power cable is firmly inserted into the MovieNite power socket and is plugged into an AC outlet.
An amber light on the front of MovieNite will come on immediately after being plugged in.
Step 4: Now, make sure to set the video input of the TV to the connector on the TV that MovieNite is plugged into.
Normally, HDMI inputs will be numbered as in HDMI-1, HDMI-2, etc.
A composite analog connection will almost always be labeled something like VIDEO, VIDEO IN or VIDEO1 or VIDEO2.
Usually, a button on the TV and on the remote will let you select the various video inputs. When the TV is set to the matching input that MovieNite is plugged into you will see either a D-Link logo during startup or the MovieNite Home screen. If you do not see the MovieNite displaying, try to toggle through each input several times until the correct TV input is found.