NOTE: This example shows the setup process of the DAP-1620. The DAP-1325, DAP-1610. DAP-1720, and DAP-1860 setup process will be similar.
Please select your version and desired configuration method:
- Push Button WPS (Recommended)
- Manual Configuration (Web UI)
Push Button WPS Setup
Note: In order to set up the extender using WPS, you must have a WPS-compatible router/access point. Also when configuring the extender using WPS, it will create a NEW network name for the extended signal similar to the network you are extending. It will add the -EXT extension and use the same wireless password as the signal you are extending.
Example:
Your router's Wi-Fi Network Name - myhome (Wi-Fi password = 123456789)
After Configuration:
New Extended Wi-Fi Network Name - myhome-EXT (Wi-Fi password = 123456789)
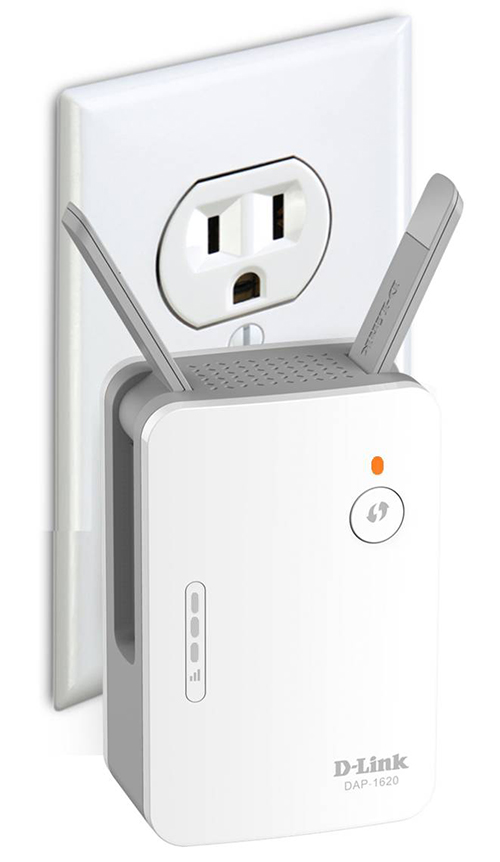
Step 1: Plug in the range extender near your router/access point. You can move it to another location after you configure it. The light should turn red and then start blinking orange.
Step 2: Press the WPS button on your router/access point. The WPS LED or the Wi-Fi LED on your router should start to flash.
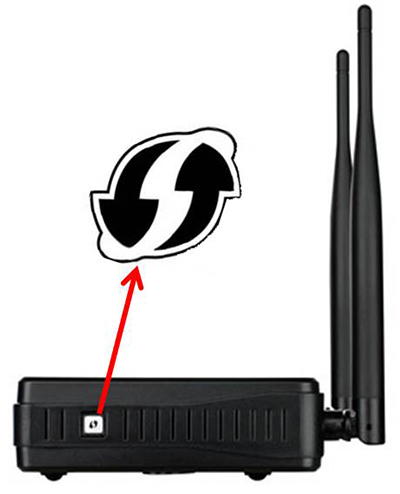
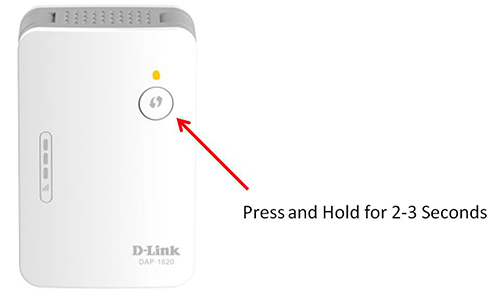
Step 3: Press and hold the WPS button on the extender for 2-3 seconds. The LED should start to blink green. Once it makes connection with your router the LED will stop flashing and turn solid GREEN. Note this process may take 1-2 minutes since the extender has to associate with both the 2.4GHz and 5GHz bands. Also, only press the WPS button once. Do not press it on either device during the process since it will not work correctly. Wait until the LED stops blinking green before attempting the WPS process again. Note the WPS button for the 1325 is on the top of the device and will only support 2.4GHz.
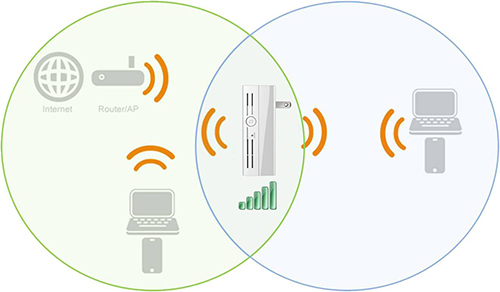
Step 4: Unplug and place the extender about half way between the router and the desired connection area.
Note: Correct placement of the extender is very important. It needs to be positioned in an area that still receives good signal from your router. Use the signal indicator LEDs to place in the best location. Three green LEDs will give you the best connection. If you are getting 1 or 2 bars, move the extender closer to the router.
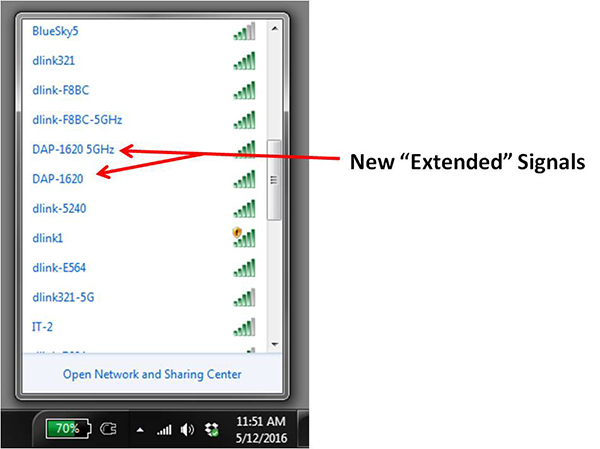
Step 5: To connect wireless to the extender, Scan for available wireless networks on your wireless device and connect to the Wi-Fi Network Name which looks like your Wi-Fi signal with the -EXT added to the end of it. The Wi-fi password will be the same as the network you are extending.
Setup is Complete.
--------------------------------------------------------------------------------
Manual Setup
Step 1: Plug in the range extender near your router/access point. You can move it to another location after you configure it. The light should turn red and then start blinking orange.
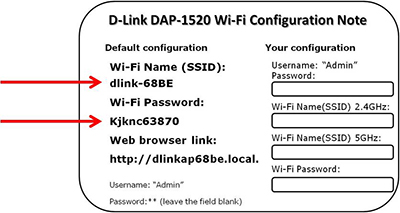
Step 2: From a wireless computer/device, scan for available networks and connect to the pre-defined SSID (Located on the Configuration note supplied with the extender and on the bottom/back of the extender) example: Dlink-68BE.
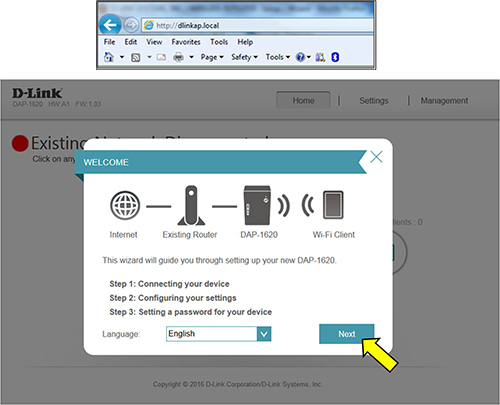
Step 3: Open a Web browser and go to http://dlinkap.local. or enter the IP address of the extender (default is 192.168.0.50). You should be directed to the configuration page and the Install Wizard will appear.
IMPORTANT: YOU MUST BE CONNECTED TO THE EXTENDER'S WI-FI SIGNAL TO ACCESS THE ABOVE SITE; YOU WILL NOT HAVE INTERNET ACCESS DURING THE SETUP PROCESS.
Select your desired Language and click Next.
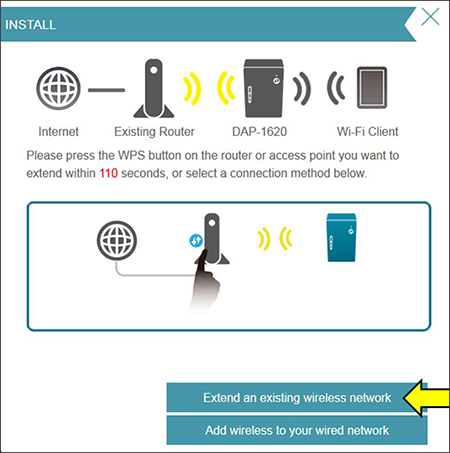
Step 4: Select the option Extend an Existing Wireless Network or Wi-Fi (on the DAP-1720/1860).
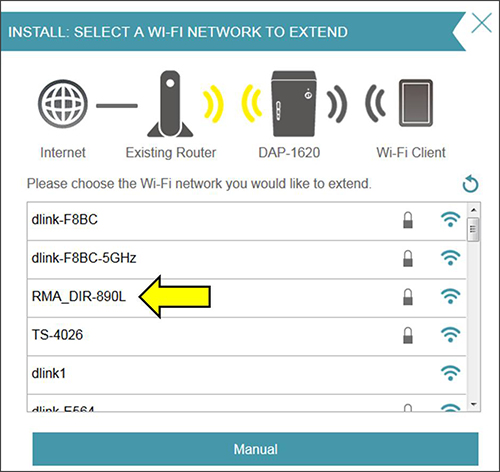
Step 5: The extender will now scan for available wireless networks. Select the network you want to extend (i.e. your router's Wi-Fi network name).
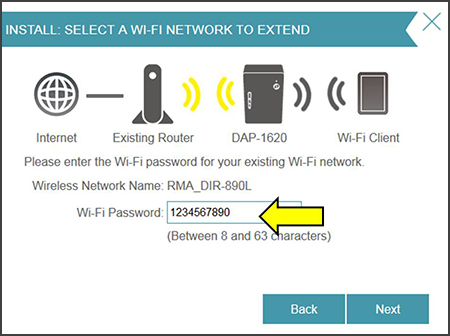
Step 6: If the network you are trying to extend is security enabled, you will be prompted to enter its wireless password. Once entered, Click Next.
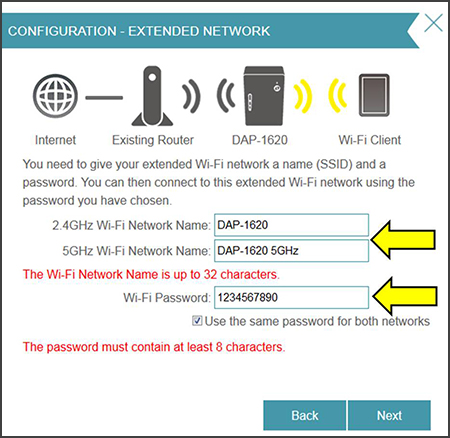
Step 7: Here you can specify what wireless network name your extender will broadcast. Enter a new network name in the 2.4Ghz Wi-Fi Network Name field and 5Ghz Wi-Fi Network Name field, then enter a new wireless password in the Wi-Fi Password field. It is recommended to have different names for the 2.4 and 5GHz bands. This will allow you to easily distinguish between the two different wireless signals.
Note: You will only see the 5Ghz wireless signal if your wireless device supports 5Ghz. The 1325 only supports 2.4GHz.
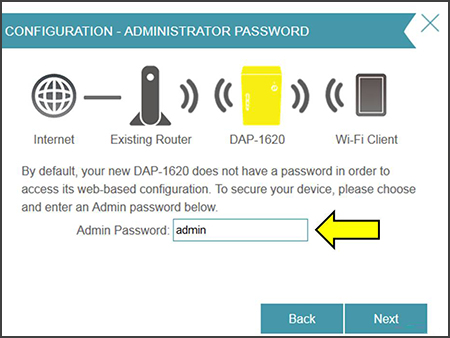
Step 8: Create a password for the configuration page access. This will be used if you want to make changes to the extenders settings in the future.
Step 9: Review your settings and then click Finish.
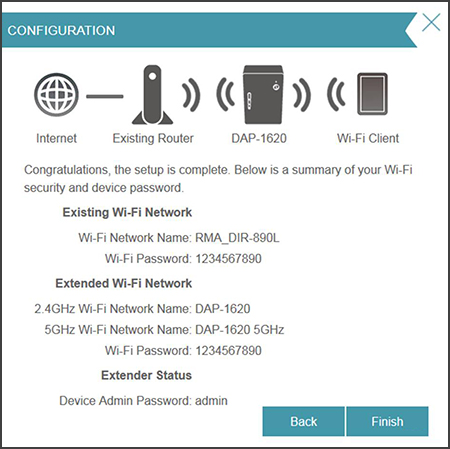
The Extender will then reboot and should now be extending your wireless network. You should notice the LED on the front of the extender is solid Green.

Note: If you specified a different wireless network name in Step 7, you will be disconnected from the extender. Please Scan again for wireless signals and connect to your NEW Extended Wireless Network.
Step 9: Unplug and place the extender about half way between the router and the desired connection area.
Note: Correct placement of the extender is very important. It needs to be positioned in an area that still receives good signal from your router. Use the signal indicator LEDs to place in the best location. Three green LEDs will give you the best connection. If you are getting 1 or 2 bars, move the extender closer to the router.
Step is Complete