Multiple SSIDs are only supported in AP mode. One primary SSID and at most seven guest SSIDs (depending on model) can be configured to allow virtual segregation stations which share the same channel.
Furthermore, you can enable the VLAN State to allow the Business Class AP to work with VLAN-supported switches or other devices. When the Primary SSID is set to Open System without encryption, the Guest SSIDs can only be set to no encryption, WEP, WPA-Personal or WPA2-Personal.
When the Primary SSIDs security is set to Open or Shared System WEP key, the Guest SSIDs can be set to use no encryption, use three other WEP keys, WPA-Personal, or WPA2-Personal.
When the Primary SSIDs security is set to WPA-Personal, WPA2-Personal, or WPA-Auto-Personal, slot 2 and slot 3 are used. The Guest SSIDs can be set to use no encryption, WEP, or WPA-Personal.
When the Primary SSIDs security is set to WPA-Enterprise, WPA2-Enterprise, or WPA-Auto-Enterprise, the Guest SSIDs can be set to use any security.
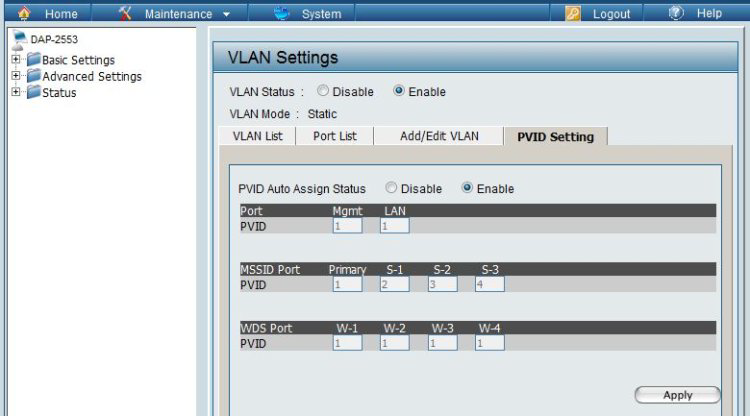
Business Class APs listed in this FAQ will support VLANs. VLANs can be created with a Name and VID. Mgmt (TCP stack), LAN, Primary / Multiple SSID and WDS Connection can be assigned to VLAN as they are physical ports. Any packet that enters the AP without a VLAN tag will have a VLAN tag inserted with a PVID.
Step 1: As most APs, the default static IP address is 192.168.0.50.
Step 2: Setup the AP with an IP Address pertaining to your Management Subnet.
Step 3: Prepare your Primary SSID in the Basic Settings.
Step 4: In Advanced Settings go into Multi-SSID to enable and start adding more SSIDs.
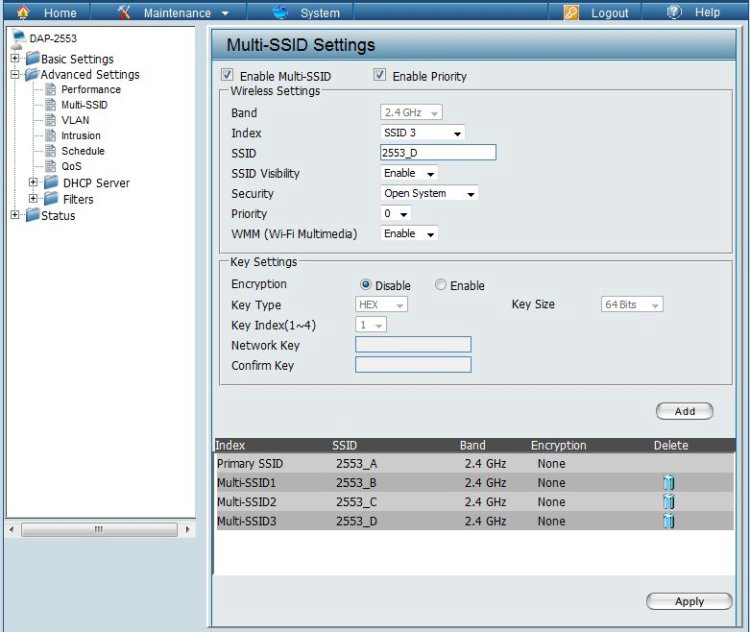
Step 5: Use the Index selection to activate the next SSID and configure the settings. Only by clicking on the ADD button will the next SSID be added to the AP. Add as many as you want or the amount supported by the AP from the Index list.
Step 6: In Advanced Settings select VLAN and Enable with the radio button. In the VLAN List, click on the edit icon to enter the default VLAN settings.
Step 7: In this default VLAN, maintain the Management and the LAN port, Untagged . Modify which SSIDs will belong to the default VLAN, though in most cases its only the Primary SSID. Once again, click on the ADD button to make the changes.

Step 8: Click on the ADD/EDIT VLAN tab, to add each of the next VLAN ID, Name and associated SSID. The LAN port has to be Tagged but the Management port set to Not A Member.

Step 9: Click on ADD for each addition. Confirm that all is assign correctly in the VLAN List.

Step 10: Click on the PVID Setting tab. Preferably set to Auto Assign if single VLANs are assign to each SSID. Click on Apply to finalize.